如何將 PayPal 交易導入 Google 表格
已發表: 2022-06-16
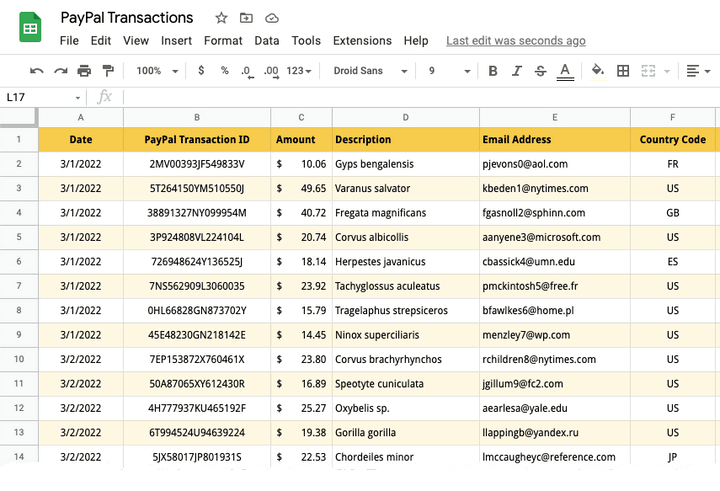
本教程將向您展示如何借助 Google Apps 腳本將 PayPal 交易導入 Google 表格。 您可以選擇將標準 PayPal 付款、定期訂閱付款、捐贈,甚至退款和拒付導入 Google 表格。
將數據導入 Google 表格後,您可以將其導出為 CSV 文件,然後將其導入 Quickbooks 會計軟件。 印度的 Tally 用戶可以將 PayPal 交易從 Google 表格導出為 XML 格式,然後將它們批量導入 Tally。
另請參閱:使用 Google 表單自動化 PayPal
在 Google 表格中導入 PayPal 交易
在本例中,我們將通過 PayPal 進行捐贈的捐贈者列表導入到 Google 表格中。
1. 在 PayPal 中創建 API 憑證
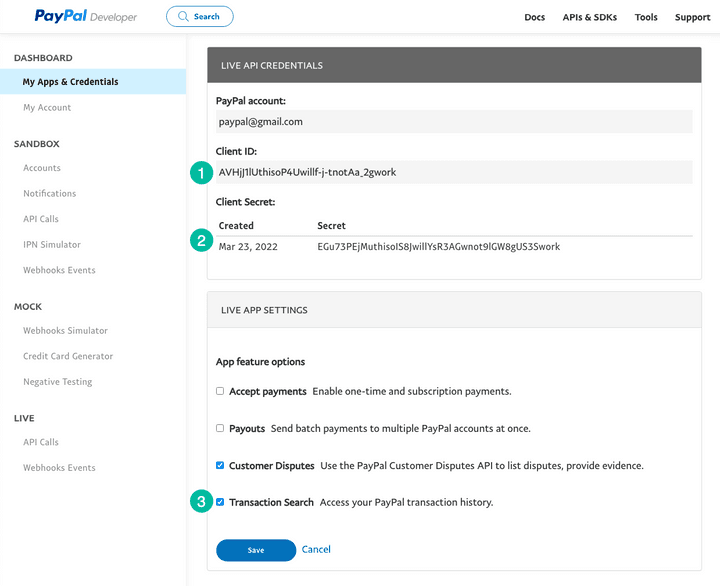
登錄到您的 PayPal 開發者儀表板 (developer.paypal.com) 並在實時模式下創建一個新應用程序。 為您的應用程序命名 - Transaction Importer for Google Sheets ,然後單擊創建應用程序按鈕。
PayPal 將創建您在後續步驟中需要的客戶端 ID 和客戶端密鑰。 在 Live App 設置部分下,選中Transaction Search選項並關閉所有其他選項,因為我們只希望 API 密鑰列出交易並且沒有其他功能。 單擊保存以繼續。

2.創建一個谷歌表格項目
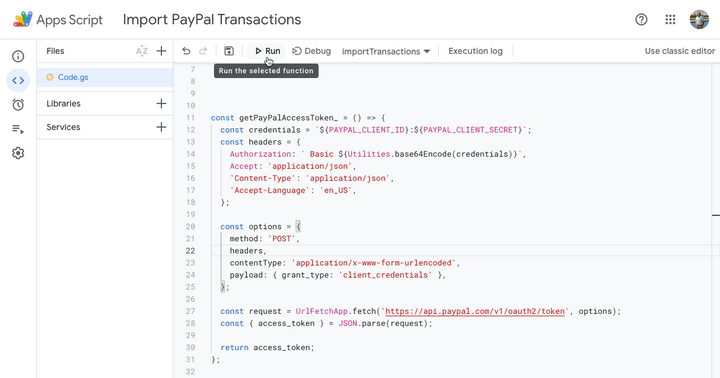
轉到sheets.new以創建新的 Google 表格。 轉到擴展菜單並選擇 Apps 腳本以打開 Apps 腳本編輯器。
將代碼複製粘貼到編輯器中。 記得用你自己的替換交易代碼。 您可以將T0002用於 PayPal 訂閱, T0014用於捐贈付款,或T1107用於 PayPal 退款和拒付。
/* @OnlyCurrentDoc */註釋是一個 Google Apps 腳本註釋,它告訴 Google Apps 腳本只運行當前 Google 表格中的代碼,而不需要訪問您的 Google Drive 中的任何其他電子表格。
/* @OnlyCurrentDoc */ /* Author: digitalinspiration.com */ const TRANSACTION_TYPE = 'T0001' ; // Enter your own PayPal Client ID and Client Secret key const PAYPAL_CLIENT_ID = '<YOUR_PAYPAL_CLIENT_ID>' ; const PAYPAL_CLIENT_SECRET = '<YOUR_PAYPAL_CLIENT_SECRET>' ; // Enter start and end dates in the format YYYY-MM-DD const START_DATE = '2022-03-01' ; const END_DATE = '2022-03-15' ; // Generate the PayPal access token const getPayPalAccessToken_ = ( ) => { const credentials = ` ${ PAYPAL_CLIENT_ID } : ${ PAYPAL_CLIENT_SECRET } ` ; const headers = { Authorization : ` Basic ${ Utilities . base64Encode ( credentials ) } ` , Accept : 'application/json' , 'Content-Type' : 'application/json' , 'Accept-Language' : 'en_US' , } ; const options = { method : 'POST' , headers , contentType : 'application/x-www-form-urlencoded' , payload : { grant_type : 'client_credentials' } , } ; const request = UrlFetchApp . fetch ( 'https://api.paypal.com/v1/oauth2/token' , options ) ; const { access_token } = JSON . parse ( request ) ; return access_token ; } ; // Append the query parameters to the PayPal API URL const buildAPIUrl_ = ( queryParams ) => { const baseUrl = [ ` https://api-m.paypal.com/v1/reporting/transactions ` ] ; Object . entries ( queryParams ) . forEach ( ( [ key , value ] , index ) => { const prefix = index === 0 ? '?' : '&' ; baseUrl . push ( ` ${ prefix } ${ key } = ${ value } ` ) ; } ) ; return baseUrl . join ( '' ) ; } ; // Fetch the list of PayPal transaction const fetchTransactionBatchFromPayPal = ( queryParams ) => { const options = { headers : { Authorization : ` Bearer ${ getPayPalAccessToken_ ( ) } ` , 'Content-Type' : 'application/json' , } , } ; const request = UrlFetchApp . fetch ( buildAPIUrl_ ( queryParams ) , options ) ; const { transaction_details , total_pages } = JSON . parse ( request ) ; return { transaction_details , total_pages } ; } ; // Extract the transaction details including the transaction ID, // donation amount, transaction date and buyer's email and country code const parsePayPalTransaction_ = ( { transaction_info , payer_info } ) => [ transaction_info . transaction_id , new Date ( transaction_info . transaction_initiation_date ) , transaction_info . transaction_amount ?. value , transaction_info . transaction_note || transaction_info . transaction_subject || '' , payer_info ?. payer_name ?. alternate_full_name , payer_info ?. email_address , payer_info ?. country_code , ] ; const fetchPayPalTransactions_ = ( ) => { const startDate = new Date ( START_DATE ) ; const endDate = new Date ( END_DATE ) ; startDate . setHours ( 0 , 0 , 0 , 0 ) ; endDate . setHours ( 23 , 59 , 59 , 999 ) ; const transactions = [ ] ; const params = { start_date : startDate . toISOString ( ) , end_date : endDate . toISOString ( ) , page_size : 100 , transaction_type : TRANSACTION_TYPE , fields : 'transaction_info,payer_info' , } ; for ( let page = 1 , hasMore = true ; hasMore ; page += 1 ) { const response = fetchTransactionBatchFromPayPal ( { ... params , page } ) ; const { transaction_details = [ ] , total_pages } = response ; transaction_details . map ( parsePayPalTransaction_ ) . forEach ( ( e ) => transactions . push ( e ) ) ; hasMore = total_pages && total_pages > page ; } return transactions ; } ; // Import the transactions from PayPal and write them to the active Google Sheet const importTransactionsToGoogleSheet = ( ) => { const transactions = fetchPayPalTransactions_ ( ) ; const { length } = transactions ; if ( length > 0 ) { const sheet = SpreadsheetApp . getActiveSheet ( ) ; sheet . getRange ( 1 , 1 , length , transactions [ 0 ] . length ) . setValues ( transactions ) ; const status = ` Imported ${ length } PayPal transactions into Google Sheets ` ; SpreadsheetApp . getActiveSpreadsheet ( ) . toast ( status ) ; } } ; 3.運行PayPal導入功能
在腳本編輯器中,單擊運行按鈕以從 PayPal 導入交易。 您可能必須授權該腳本,因為它需要權限才能連接到 PayPal API 並代表您將數據寫入 Google 表格。

而已。 如果在選定的日期範圍內有任何 PayPal 交易要導入,腳本將運行並將交易導入 Google 表格。

在本教程的下一部分中,我們將學習如何將 PayPal 交易從 Google 表格導出到 XML 文件,以便導入到 Tally 會計軟件中。
另請參閱:從 Google 表格發送 PayPal 發票
